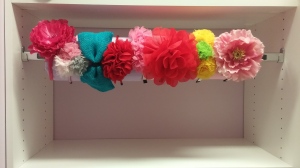
Updated DIY Headband Holder!

My most popular post here is always my DIY Headband Holder how-to.

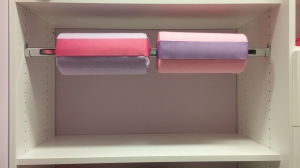
The version I created then is meant to be hung on a hook. Working with my girls’ new closets, I came up with a more integrated placement for it. Their closets are fantastic in the way that they are extremely customizable, allowing for changes such as shelving vs. hanging space. I followed the same directions as my older post until placing the ends-like the flowers. Instead, I now put a hanging rod through the tube. To help it stay in place I added a strip of No Slip Grip tape I use when creating clips onto the top of the rod. In addition, I stuffed each end with tissues as far as I could. As shown, 2 rolls fill the rod. Since my girls have way more headbands, I will definitely be adding another rod or two, probably removing the shelf underneath for more space!

(The ribbon is for decorative purposes only-a cute way of hiding the seam. You can also just face it towards the back to have a seamless look or if using a printed fabric.)

Happy crafting:)0628151712 0628151718

DIY headband holder

I’ve been meaning to make a headband holder for my girls since forever and finally had a chance today! On the left is one of my complete no sew holders. I made two of these today (one set for each daughter) but once you figure out what needs to be done it’s fairly simple.

I have seen this style with just the top part, but as I create hair accessories that I sell on my other blog-Mbellishd-check it out!, my girls needed more space so I added the bottom section. I think I may add a third sometime as well. I also plan to add two white hooks on the very bottom for their pony holders.

I figured I will share how I did it with step-by step pix and instructions. Hope it’s all easily understood! Let me know if you have any questions:)

What you need:

1 roll of paper towel per section

measuring tape

scissors

embellishment for ends (can be buttons flowers etc.)

glue gun

material (app. 19″ x 22″ for each roll)

4.25 feet of ribbon (not pictured)

———-

You want to get your paper towel roll to about 5-5.25″, so unroll the excess until you get to desired width Continue reading

Nail polish holder – thinking outside the box:)

Here are pix of how I store my nail polishes. It is not a large collection at all but they have to go somewhere! I purchase this tiered plastic tray at The Container Store. It was in the kitchen department, I guess for cabinets or under the sink use, but it’s perfect for finding the polish I’m looking for at a glance! You can find it here. I definitely recommend walking down their aisles if you’re in an “organizing zone” and keep your eyes peeled for using something for your needs as opposed to what its meant for:)

The tray also keeps the polishes safely displayed on my shelf-with the high lip all around it that keeps them all in place. I organized them by placing currently used ones at the bottom, more springy and summery colors in the middle and my daughters’ at the top.